The weather tanked. Fuel is low. Your right arm even aches in homage to Jimmy Stewart’s plight from Strategic Air Command. The 1955 Hollywood controller stares into the scope and reports the field is 100-¼. He offers a hold at the marker, but you say, “I can’t hold. I’m committed. I don’t have enough fuel to go around! Bring me on in.”
Ah, but where Stewart had Leo in the back seat and PAR guidance from the ground, you have only your wits and an iPad. Hey, it’s a self-service world. Deal with it.
Minimums, Shminimums
Every flight starts and ends with at least a brief venture though visual flight. Those will be as brief as possible today. Hopefully you never need this skill for your own Jimmy Stewart moment, but zero-zero is a great exercise. The needles get sensitive in those last stages. Success demands precision and an excellent scan. Fail something and it gets much worse. Good thing crashing the sim requires a reboot at most.
Any plane will do; pick your favorite. Start at Raleigh County, Beckley, WV (KBKW). We recommend ramp-to-ramp, but you can start on Runway 28.
You’ll need to pull some strings to get zero-zero. In X-Plane, create an overcast stratus layer with high tops and bases below ground level. Visibility doesn’t really matter, but slide it to the minimum anyway. This should create just enough visibility to see the centerline while you’re sitting on it. In Microsoft Flight Sim, true zero-zero is difficult with the diffuse and transparent clouds the sim generates. Adding heavy rain will help. Just don’t cheat and look out early. Set the winds from 280 at seven knots.
Disable the iPad connection with the sim. That will eliminate your moving map and synthetic vision, but you’ll get them back later. No autopilots today, either; this is a hand-flying exercise.
Ready? Go Anyway!
Make a zero-zero departure from Runway 28 and climb to a safe altitude. If your sim has WAAS GPS, pick whatever RNAV approach you think is most likely to get you safely to the runway. If you don’t have WAAS, you really only have one approach to choose from.
You’re on your own here without ATC, so you’ll need to get yourself established on the approach. Fly all the way to a zero-zero landing … hopefully stopping while there’s still a runway beneath your wheels. If not, at least try to survive. Using your GPS’s moving map is acceptable, but no iPad and no synthetic vision.
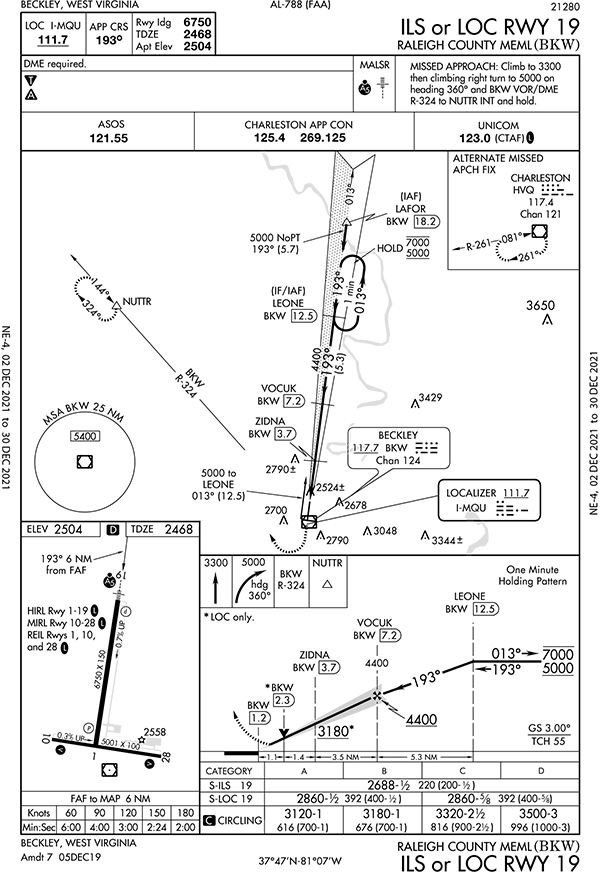
Crawl your way back to Runway 28 and re-enable the iPad connection to the sim. Depart and climb again. This time, join the ILS Runway 19 approach regardless of your avionics. On a panel-mount GPS, put up a screen with no moving map or other flight information, such as track. You do have the iPad for this approach. If you have syn vis, activate it. Fly this approach all the way to a blind landing using all the cockpit tools remaining. Attempt not only to survive, but to have a reusable—or at least repairable—airplane.
Take off again and climb to a safe altitude. Now, turn off your computer monitor. Yeah, you read that right. This time it’s the iPad alone. All the approaches are on the table. You choose. Do whatever it takes to survive without your instrument panel.
Good luck, “Dutch.”
Post Mortem
Let’s discuss some of the challenges we saw. If you haven’t yet tried this in your favorite sim, or at least worked through it from your easy chair, you should stop here and give it a try first.
1. What zero-zero takeoff technique did you use? Is it a practical real-world procedure?
2. How’d you climb from Runway 28? How high did you go to be “safe”?
3. How’d you get established on the first approach?
4. What approach did you choose the first time around?
5. What strategy did you use to land? In what configuration and power setting? Did you brief the DA?
6 What about flying an RNAV versus an ILS? What other factors might influence your choice of approach (or even airport) in the real world?
7. Was the second landing easier?
8. How did you set up the iPad for the last approach? Did you bother with a published approach? How did you fly this without vertical guidance?
Truth be told, neither Ryan Koch nor Jeff Van West have seen Strategic Air Command in its entirety. But they both know Stewart in The Spirit of St. Louis—and way too many views of It’s a Wonderful Life.
Our Take – You might have different, valid answers—or even different questions.
1. The FAA’s Instrument Flying Handbook suggests practicing instrument takeoffs to “provide proficiency and confidence necessary for use of flight instruments during departures under conditions of low visibility, rain, low ceilings, or disorientation at night.” It suggests aligning with the centerline, setting the heading indicator to the nearest five-degree increment, and then precisely holding heading during the roll. Real world practical? You tell us.
2. Hopefully, by using the obstacle departure procedure. It requires a climbing right turn to 320 before turning on course. There’s no “on course” here—just a safe altitude. You could pick the OROCA from the relevant chart. Since this is an emergency you could use the minimum safe altitude (MSA) of 5400 MSL on the approach chart. That altitude is (usually) obstacle-free within 25 miles of the runway waypoint for the RNAV approaches, or the VOR for the ground-based approaches. MSAs are for emergency use only, unlike an arrival quadrant on a TAA.
3. Without ATC, you’re on your own to get established. The sure thing is starting from the Beckley VOR (BKW). Every approach has a feeder starting from that VOR with a published course and altitude. Or you could use the MSA as mentioned above and just get to the fix at that altitude.
4. The wind favors Runway 28, but there’s no vertical guidance on that approach. It’s also the shortest, and you want all the runway you can get for this landing, even with a direct crosswind. Runway 19 has approach lights, which normally give it the edge. They’ll be hard to see today. It also has slightly lower minimums than Runway 1, which is likely obstacle related. Runway 19 probably offers your best chance of survival. Without WAAS GPS, it’s a no-brainer to fly the ILS.
5. A normal flare would be a challenge here, even with a radar altimeter. Too high and you’ll drop like a rock as you stall. Wait too long before flaring and you dive straight into the runway. A better approach might be akin to the glassy water technique that float pilots employ. Slow down and establish a 100-200 FPM descent. Hold that profile until hitting the runway, probably ignoring the crosswind and sideloading. But, when do you transition to that slow descent? You could fly the whole approach at your normal speed and transition in those last 100 feet while trying to hold your heading. Or you could transition to full flaps and minimum forward speed while still on glideslope. This will give you a stable setup for minimum descent rate, but on a three-degree glidepath.
There’s no right answer, only tradeoffs. DA is pretty pointless in and of itself. What matters is the altitude of transition—and of the pavement.
6. RNAV glidepaths are rock-solid all the way to the pavement (or until removed from the display, depending on your GPS). ILS signals are susceptible to interference and typically don’t guarantee any stability below DA. That’s not usually modeled in the sim, but our choice is still the RNAV (GPS) Runway 19. Turning up the runway lights isn’t normally modeled either, but in the real world we’d want them as bright as possible, and they do reach high intensity at this airport (see HIRL in the small airport diagram). In the real world, a runway served by a Cat-II or -III approach would have even brighter lights, centerline lights, and an ILS that was stable to 100 or even 50 feet AGL. Something to consider if you ever find yourself in this situation.
7. It probably was. While closing in on the ground with a slate gray windshield, it’s nice to see there’s a runway using synthetic vision. If you’ve never practiced this, however, just the act of looking down at the iPad at this critical stage can be disorienting—enough that you might be better without it. There are a few other traps. The iPad usually only knows your track and its synthetic vision assumes heading equals track. Not so with the crosswind on Runway 19, so the outside picture won’t match the iPad. Not a big deal when we can’t see out the window anyway, but in the real-world, don’t expect the iPad’s synthetic vision to be a good guide for where to find the runway. On the other hand, if you have a PFD with synvis, it should show the actual aircraft heading and relative position of the runway.
8. You could just go direct to the airport and maneuver to align with a runway. Better is loading an approach into the iPad flight plan and then activating the leg you want to join. That would get you an HSI and the alignment with the runway of your choosing. CDI scaling won’t be what you’re used to from an IFR GPS. Garmin Pilot shows cross-track error down to individual feet while ForeFlight is only to 0.1 NM. As for the vertical, it can be helpful to remember that three degrees is 300 feet per NM. Two miles from touchdown you should be about 600 AGL, one mile out you should be about 300 AGL. Get stabilized early because without power gauges you can only infer those settings based on descent rates.


