My instrument instructor was a glass half-full kind of guy. His response to my first ILS was, “Well, at least there is room for improvement.” An ILS became the one approach I most dreaded. But now that I’ve got a bunch of ‘em under my belt, it’s actually the approach I prefer. How’d I get there? I’m glad you asked.

Practice Makes Perfect
Of course, the more you practice precision approaches, the better you’ll get. When I’m flying for my day job, most of the runways have an ILS. So, even in visual conditions, I get to fly a few ILSes every day. Our approach briefing goes something like this: “The weather is good. We’ll plan the visual to Runway 24R. Back it up with the ILS, 108.5. The ILS 24R is in the box…” In other words, we fly nearly every approach as an ILS, even in visual conditions. After a while you couldn’t help but get good at ‘em.
Flying an ILS in visual conditions all the time was the best of both words. I had the low stress of a visual approach, yet I got to fly the ILS and observe the aircraft’s response to the inevitable instabilities. By “inevitable instabilities” I simply mean real life outside of a sim set on zero wind and zero turbulence.
In IMC, you’re busy keeping the needles centered, reviewing the minimums, watching the altimeter, planning the missed, etc. You’re simply not as aware of every little control input and the aircraft’s response to those inputs as you can be when you’re flying the ILS in visual conditions. It’s just that understanding of Newton’s equal and opposite reactions that can help you master the ILS.
So, to get better at them, fly an ILS every chance you get—even using ILS guidance on your visual approaches. There’s a bonus: you’ll get better at visually managing your glidepath, too.
What’s Primary?
Most of us are well past that old argument of whether elevator (pitch) is primary for glideslope (altitude) or for airspeed. We’ve discussed in these pages that the elevator is your primary control to fix what’s most important to you right away, but that you’ll likely need a power adjustment to maintain equilibrium. If you can learn to anticipate the need for that power adjustment, you can make both the pitch adjustment and the power adjustment at the same time.
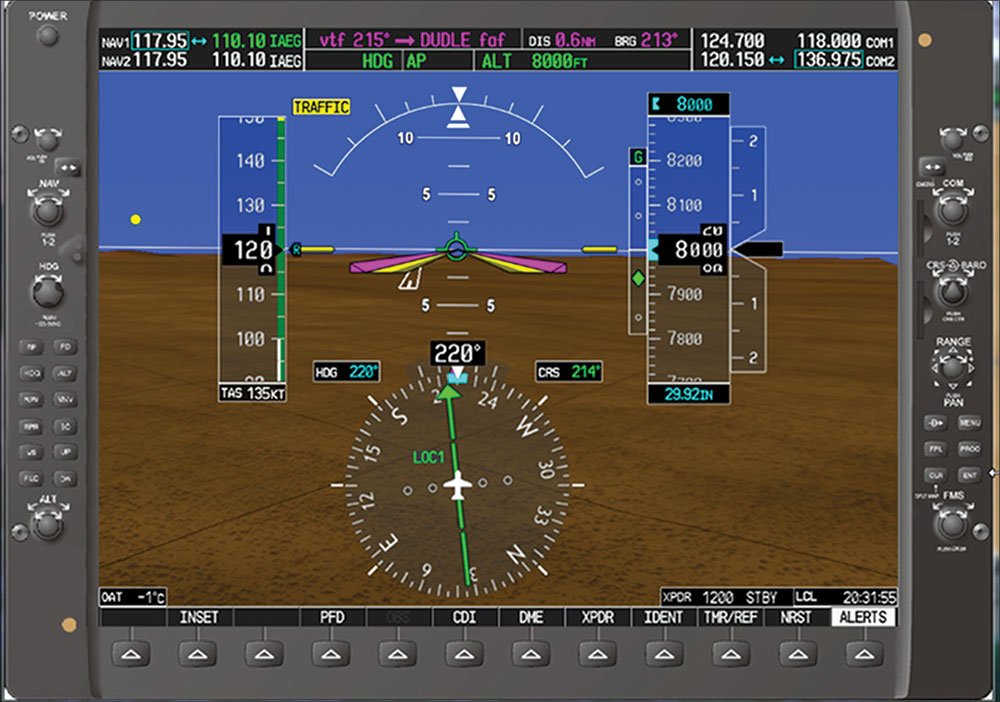
Say you’re flying an ILS perfectly. Both needles are centered…until the glideslope pointer starts to drift down—you’re rising above the glideslope—as your headwind dies. You notice the needle begin to drift down immediately, before it’s barely off the center mark.
You give that primary elevator control a slight forward pressure to recapture the glideslope. But from your Newtonian observations in visual conditions, you also know that you’ve got to make other adjustments. In fact, there are really two that you must make.
You entered a correction by applying forward pressure to the elevator. You were not descending enough, drifting further above the glideslope. So, you chase it. Say you nominally need 600 feet per minute to fly the glideslope. With the headwind, you only needed about 550 until the wind shifted, then you need 570. If you simply increase the pressure to achieve that 570, you’ll prevent the glideslope needle from drifting any further from center, but you won’t bring it back. So, you push a bit more to, say, 600. Once you’re back to the center you slightly reduce the forward pressure on the elevator to achieve that 570 feet per minute to maintain the center.

Of course you’re not watching your VSI; you’re making these fine adjustments by feel while looking at the glideslope needle. The point, though, is that the amount of your adjustment to correct your displacement from center is more than is required to maintain the center once you’re back to it. So, that’s one of the adjustments you’ve got to make: relaxing a bit of that new elevator forward pressure to maintain the center of the glideslope once you’re back on it.
As you’re now descending a bit more quickly, your airspeed will naturally creep up, so you’ve got to reduce power. You may note that the power adjustment is actually two adjustments just like the glideslope—reduced power to stay on airspeed as you correct the divergence to recapture the center of the glideslope, and just a bit more power once you’re there, but still slightly less than you had before the correction was necessary. But, if you anticipate it with the initial glideslope change, the mass of the airplane probably hasn’t changed speed yet, so you can just make one adjustment.
This is an ILS with both horizontal and vertical components. You just fixed the vertical component because the headwind died down a bit as you descended on the glideslope. Why did that headwind die down? Quite possibly because not only is the wind speed somewhat reduced closer to the ground, but it’s also shifted to the right.
Remember that in the northern hemisphere (Apologies to our readers south of the equator, but you’re probably already used to thinking of things backwards to what we say anyway.) the wind shifts clockwise as you get closer to the ground. You can often notice this difference even in the height difference between the FAF and the DH, so as you see an effect from reduced wind on your glideslope, be prepared to make the corresponding adjustment to your heading to stay on the localizer.
In the Real World
The preceding was a nice academic discussion, but the application in the real world where you’re simply gettin’ yer butt kicked like our buddy Hapless Hal in the cartoon, is a bit more challenging.
When you’re on the leading edge of that front and you’re just trying to get safely on the ground in the reduced visibility of the rain and low clouds, and the wind is coming from all directions at once, well, it’s not quite as simple as a couple adjustments to get back to a stabilized power, pitch and heading. In fact, it’s really a constant adjustment of all three at the same time. The beauty, though, of that academic discussion is that the same principles apply, but not quite so conveniently.
When you’ve got your hands full with the needles dancing, you can dump the two-step idea of correcting a displacement then restabilizing for the new center. But, you can and should continue to make the initial correction with a bit of elevator pressure while just about simultaneously making the appropriate power adjustment.
If you can get to the point where every upset to the glideslope is met with the appropriate pitch and power changes, you’ll find that even in the worst conditions you’ll usually be able to maintain things within about one dot. And there are few things more satisfying (in aviation) than nailing the ILS in the most gnarly conditions.
It took Frank Bowlin hundreds of approaches to understand how to get the needles to the center, then hundreds more to learn how to keep them there.
It’s interesting that we all understand how crosswinds affect our course, but when that wind affects our glidepath the discussions can get quite lively.
The ideal glidepath is three degrees. Simple trig tells us that’s a path that drops 318 feet per mile as we approach the runway. At a ground speed of 120 knots, or two miles a minute, our VSI would read 636 feet per minute to descend at 318 feet per mile on glidepath. That descent rate will keep you on the glidepath as long as your ground speed stays at 120 knots, or in no wind, an airspeed of 120 knots.

But if there’s a headwind turning your 120 knot airspeed into a 110 knot groundspeed you’d be descending at (636 feet per minute divided by (110 over 60) miles per minute) 347 feet per mile. You’d fall below the desired glidepath. You could fly the approach at a groundspeed of 120 knots, but we fly approaches with airspeed, not groundspeed.
Since 120 knots is your desired approach airspeed, you’d need to maintain a vertical speed of (318 feet per mile times (110 over 60) miles per minute) 583 feet per minute with that 10 knot headwind.
So, you’re flying the ILS perfectly at 120 knots and 583 feet per minute with the glideslope staying centered. But as you get close to the ground, that 10 knot headwind falls off to five knots, increasing your groundspeed.
At this point you probably know what’s coming. You just reduce power a bit, maintain 120 knots while your vertical speed increases to about 610 feet per minute.
Of course, none of us can read our VSI that closely or get it that exact. All of this is done by feel. This is just the math.
Maintaining a glidepath is similar to maintaining a course. They’re both paths over the ground, but one is vertical and the other is horizontal. You intuitively know that if your crosswind increases, you turn further into it to maintain the same course. Well, you can think of the same correction for wind on a glidepath, but you use power instead of a crab—more power for an increased headwind and less for a reduced headwind. If your headwind increases, you increase your power (maintaining your airspeed) to reduce your descent rate to stay on the vertical path. Likewise, if the wind decreases, you reduce power while maintaining airspeed to increase your vertical speed to maintain the glidepath.
Not convinced yet? Consider the extreme case where your airspeed is 120 and the headwind increases to 120. You’re not moving over the ground at all. To maintain your place on the ideal glidepath would require the most power—enough power for zero descent rate since you’re not moving forward over the ground and therefore not needing to descend. —FB.


