
Every flight, even a VFR flight, has a departure procedure and an arrival procedure. On VFR flights that might just be make a left turn and remain in the pattern. Often times, particularly at a non-towered airport, you will make up procedures yourself.
But on an IFR flight things are never so simple. There must be some sort of fixed plan that both the pilot and controller agree upon. With some exceptions you can’t just fly around for a bit and figure out which way you would like to join up with your assigned route. Figuring out which route to take after departure or upon arrival is often rather simple but can sometimes be quite complex. Usually the complexities are more significant at non-towered airports. Airports with a control tower typically give us very explicit instructions on how to depart or arrive. With that in mind, let’s first take a look at how to depart a non-towered field and then look at departures from a towered field. Finally we’ll take a look at arrivals.
Gettin’ Out
If you are departing from a non-towered field then the first obvious question is how do to obtain our clearance at all? In the past this might have been difficult to determine. But these days things have become much easier.
If you’re lucky, you might be able to reach ATC by radio on the ground. This is the best of all possible options. If not, check the Chart Supplement (formerly the Airport and Facility Directory) and there should be a phone number for you to call the nearest Approach or Center facility. If none of these work, you can call Flight Service (by radio or phone) and they will help you obtain your clearance.
But whatever method you use, be sure that you are ready to go (run-up complete and close to the runway entrance) when you call. It makes things simpler for everyone if you can leave immediately. In fact, it’s best if you tell them you’re ready to go and the runway. For example, “Cloudsplitter 5678CS, at Hometown, pick up clearance to Awaytown. I’m number one, ready to go on Runway 21.”
The clearance you receive will be similar to a clearance that you get at a towered airport with one major exception—when you can execute the clearance. If the controller tells you, “Hold for release” that means that you cannot execute the clearance just yet and you must wait on the ground until you are cleared for release. The other possibility is that you will be cleared for immediate departure with something like, “Cleared as filed, climb and maintain XXX feet, squawk YYYY, departure frequency 133.35, clearance void if not off by 2103 Zulu. If not off by 2103 Zulu, contact Center by 2110 Zulu and advise.”
The purpose of the void time in the clearance is to allow you some time to take off. You might not be able to take off immediately even though you have completed your run-up. Perhaps the run-up area is not near the departure end of the runway or maybe another aircraft has cut in front of you or one is now in the pattern. But AIM 5-2-7 tells us that you only need to be off the ground by the void time, nothing more.
Usually you will have about five minutes on the ground before the void time. But you don’t need to contact ATC by the void time; you just have to be in the air by that time. Once in the air remember “aviate, navigate, communicate.” It shouldn’t take you 10 minutes to call departure but if you need the time to leave the CTAF and be clear of traffic, ATC can wait. And if for any reason you cannot get off the ground by the void time that ATC has given you, you cannot use the clearance and you need to contact them (by phone, radio or FSS) and let them know that you were unable to depart.
Once you are in the air, which way do you turn? That depends on several factors. You will need to get to the route that has been assigned in your clearance. But can you just get there willy-nilly? The simple answer is yes. If the weather is clear and you can easily see nearby obstacles, then just expeditiously get to the route any reasonable way you would like.
But what if the weather isn’t so good? How do you know that you won’t hit a hill somewhere? Take a look at the sectional chart for San Martin airport (E16) in Santa Clara County, California. The airport sits in a valley with hills on either side rising to nearly 4000 feet. Just heading northwest or southeast won’t guarantee that you’re not pushed by the winds into those hills as you climb to join your clearance.
In this case, a much better answer is to follow the Obstacle Departure Procedure (ODP). The ODP for Runway 14 tells you to fly heading 141 to 5000 feet and the Salinas VOR radial 355 to the Salinas VOR before proceeding on course. This will keep you clear of all obstacles. Executing an ODP does not require a clearance from ATC any more than flying VFR to join your clearance does. However I have found it helpful to let ATC know that I am following the ODP once I contact them so that they know what I am doing. Perhaps they will be able to give me a shortcut once I get above their Minimum Vectoring Altitude.
Easier With a Tower
If you are departing from a towered airport the solution to your departure questions becomes much simpler. At Class Delta airports you can pick up your clearance by calling either Ground Control or Clearance Delivery. Check the Chart Supplement (or your EFB) to determine if a Clearance Delivery frequency exists. If you are departing from a Class Charlie or Bravo airport then there will always be a Clearance Delivery frequency. You should call for your clearance before you call Ground. In fact, the best solution is to copy your clearance, read it back, then take the time to understand it and program your radios and GPS before calling Ground for your taxi clearance.
Your clearance from ATC will tell you what you need to do and where you need to go. Sometimes they will describe your route longhand, telling you each heading and waypoint to use until you are able to join the en-route structure. But giving you all the details can waste valuable ATC and radio bandwidth. So to abbreviate things, Departure Procedures are frequently used.
A Departure Procedure is a detailed set of instructions for how to take off and join the en-route structure. By giving you the name of the Departure Procedure, ATC has given you the detailed instructions in just a few words. It is now incumbent on you to look up the Departure Procedure and understand exactly what it entails. The Departure Procedure will also exist in your GPS database. The smart move is to use the Procedure key on the GPS to call up the Departure Procedure (and any transitions that were issued) and add them to the flight plan. Then once you have understood where the Departure Procedure takes you, the GPS should be able to hold your hand and guide you through.
However the GPS database might not include altitude restrictions that exist along the procedure so once again your knowledge of the procedure is absolutely necessary to insure compliance. Having a printed copy (or called up on your EFB) is essential at this time.
Departure Procedure
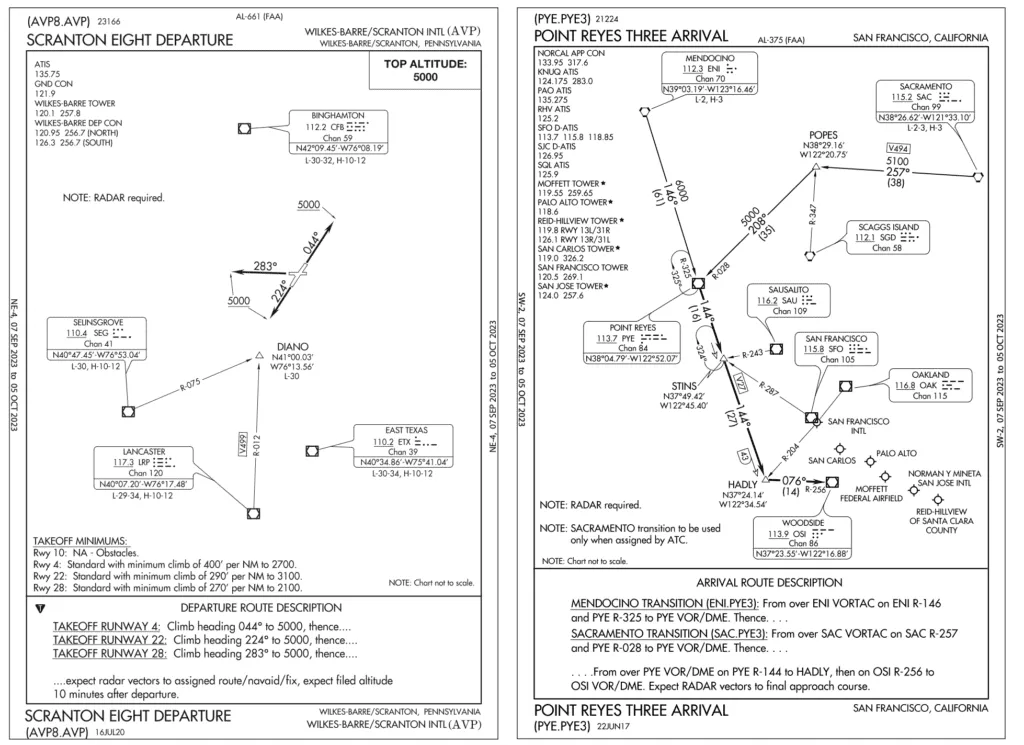
As an example take a look at the Scranton Eight Departure Procedure at Wilkes-Barre/Scranton International airport (KAVP) in Scranton, Pennsylvania. The first problem you will encounter is that the controller read you the name of the procedure as “Scranton Eight,” yet the procedure is coded as AVP8. That’s how your GPS navigator will spell it. I’ve seen this sort of name variance throw students for a loop several times.
Once you’ve entered the DP into the navigator, review the entire flight plan to be sure that it conforms to your understanding of how the procedure should be flown. In previous software releases the radar vectors segment was labeled “ManSeq” which stood for Manual Sequence. That would confuse folks, so recently Garmin has started updating their software. Their flight plans now use the term “Vectors” instead of ManSeq. That’s a lot easier to understand. Their two inch navigators (GPS 175, GPS 375) already have this update. They are planning a software update for their larger units (GTN 650/750) for later this year.
Once you have entered the Departure Procedure into your GPS flight plan, be sure that the rest of the route is entered into the plan. There’s nothing worse than getting in the air in busy airspace and then finding out that the GPS needs additional programming.
Arrival Procedures
As you fly along your route you might encounter an Arrival Procedure. Arrival Procedures have the same purpose as Departure Procedures. Both allow the controller to give you a complex routing without taking valuable radio time. They both also will organize the flow of aircraft into a particular area. However where Departure Procedures apply to a specific airport, sometimes Arrival Procedures apply to multiple airports. This can make looking up the procedure in the Chart Supplement problematic.
As an example look at the Point Reyes 3 Arrival Procedure for Reid Hillview (KRHV) in Santa Clara County, California. First off, as before the name is less than obvious: PYE-PYE3. But although you may be headed to Reid Hillview, the procedure serves multiple airports—San Francisco, San Carlos, Palo Alto, Moffett, San Jose, and Reid Hillview. Serving so many airports the description can’t be listed with all of them. In this case, it’s only listed with San Francisco.
Typically an Arrival Procedure is listed with the largest airport that it serves. If you can’t find it listed for your destination search the nearest large airport. Once you have been issued and found the procedure, study it and program it into your GPS. This can be more difficult than a Departure Procedure. With a Departure Procedure you are on the ground when you do all that. With an Arrival Procedure you are already in the air and are approaching your destination. Time is limited. The arrival might even be a surprise if you had searched your destination airport before leaving and didn’t find any Arrivals. You should have searched nearby major airports to see if any of them include your destination.
If you have problems finding the procedure in the air or understanding what needs to be done, do not hesitate to let the controller know. At a minimum they can explain it to you or provide vectors to give you more time. Once you understand what needs to be done and have programmed the GPS, be sure to review the entire flight plan in the GPS to confirm that what you have programmed is what you intended. I’ve seen many cases where what a pilot programmed was not what was intended. Make sure the en-route portion of the GPS flight plan interfaces seamlessly with the Arrival Procedure. Sometimes there could be redundant or iterative waypoints that might take the plane backwards. Also be sure that other radios and devices are correctly set up—altimeter, autopilot, VOR’s, etc.
In general Departure Procedures and Arrival Procedures are not that difficult. They are intended to make life easier for both the pilot and the controller. But it is important to review all the steps of the procedure, be certain that you understand them and have programmed them into your radios properly. Once all that is done actually flying the procedure is the easy part.
What Altitude?
Several years ago the FAA instituted a new phraseology, “climb via” or “descend via.” These phrases are used with both Departure Procedures and Arrival Procedures. These simply mean that you must comply with all speed and altitude restrictions that are published on the procedure. Note that these restrictions will be published for a fix, just as you see on approach charts. The mid-segment altitudes are, as always, just MEAs and are not for climb/descend via. Also note that on Departure procedures you’ll typically see a bold box at the top identifying your top altitude. Once all your crossing restrictions are met, this is your final altitude until you get further clearance.
I’ve always thought that “climb/descend via” is redundant. After all, if you are assigned a procedure you are supposed to follow it. But apparently enough pilots were ignoring the speed and altitude restrictions and the new phraseology helped sort things out.
When you are given Descend Via or Climb Via be sure to pay attention to speed and altitude restrictions in the procedure (as you should with all procedures). If you have been given a Descend Via or Climb Via clearance you may subsequently be given a different altitude to climb or descend to. If you are given a new altitude that will override what is on the chart.
Ken Maples is a CFII in the mountains of Colorado where arrival and departures procedures are so rarely used that he gets excited when he finally gets one for real.


